
2 - Pour candles
Supplies:
- Paraffin
- Stearin
- Casting mold
- Wick
- Food coloring
- Needle + stopper
- Libra
- Watering can
- Bain-Marie ladle
- Thermometer
- Melting table
Preparing to pour candles into molds.
Cast candles, also often called pillar candles, are formed by allowing the paraffin mixture to harden in a mold.
Molds can be made from PVC, metal or silicone molds.
 1. Pour the wax into the stainless steel container and heat it to 80-90°C in a double boiler. Add 10% stearin.
The correct wax temperature is essential for obtaining a smooth surface and easy removal of the candle from the mold!
Be careful when melting directly in a pan!

2. You can get the desired shade by adding color powder to the wax (standard color).
Follow the indicated quantities on the packaging:
- approximately 2 - 4 g powder for 1 kg of laundry.
- color test: pour a little liquid colored paraffin into a bowl of cold water.
Too much color powder can reduce the flammability of your candles.
Always stir well or use a mixing stick.
Have you used our colored paraffin yet? The controlled composition of paraffin, stearine, dye, and fragrance ensures the correct composition during candle making.
3. Preparation of the mold.
a. The pit must be adapted to the diameter of the mold.
For non-cylindrical shapes, the average diameter is decisive.
b. Use our needle, which can be guided through the mold (at the bottom). Other needles are too thick where the wick is located.


c. Use the stopper that comes with the needle to close the bottom of the mold. Tighten the wick between the needle and the stopper.
After everything is securely fastened (wick, wick holder, etc.), the shape at the bottom where the end of the wick is located can be cut off.
Make sure the wick is straight and not twisted in the mold. A twisted shape can cause uneven burning.
Always use flat wicks (these are reinforced) instead of round wicks. Round wicks are recommended for stearin candles. Cut at an angle, the wick fits more easily into the mold.
(needle + stopper )

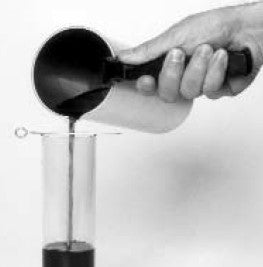
4. Fill the mold with liquid wax. Don't fill it to the brim, but stay within 1 cm of the edge. This prevents your candle from wobbling later, which would require extra work to level the bottom. As the wax cools, a crater (shrinkage hole) will form. Pierce the paraffin and fill the crater once or twice. This can be filled by pouring wax in one or more times.
When casting in layers, the mold can be placed in an inclined position (place the casting mold on a sand bed).
5. When the wax has completely cooled, cut the wick off the needle. Then remove the candle from the mold. If the candle is difficult to remove, place the mold in the refrigerator for a while.
Alternative pouring candles:
- Garden candles
- Candles in glass
- Candles with two or more colors
Tips for pouring candles:
- First melt the stearine together with any colorant before melting the paraffin.
- Stearin promotes shrinkage, which makes it easier to release the candle from the mold.
- Pouring at a low temperature (+/- 65°C) gives a rough look to the candle
- Pouring at high temperature (+/- 90°C) gives a smooth and shiny look to the candle.
- If the temperature in the workspace is not stable, take seasons into account.
- If you have used too low a temperature but still want a shiny candle without having to melt the candle, you can always use dip varnish.
- At temperatures below 71°C (160°F), the candle will have a marbled appearance. However, you will then need to clean the mold more often. This method of using lower temperatures is also called cold casting. For a more even appearance, it's better to use marble wax.
- If the paraffin mixture has exceeded 100°C, this mixture can only be used for making outdoor candles.
- Preheating the mold will make it easier to release the candle from the mold.
- Fill the casting mold to within one cm of the edge to avoid extra work afterwards.
Important:
- Cover the work surface and wear an apron!
- Make sure the mold is clean and dry when pouring the wax.
- Prepare only as much color as you need.
- Check the temperature of the wax with a thermometer.
- To clean the casting mold, use warm water and rub the mold with a dry cloth or paper towel.
Warning:
- Only light candles in the presence of adults.
- Beware of fire: never heat the wax directly in the mould.
- Never heat the wax directly in a pan or over an open fire.
- The wax vapour is flammable at 180°C.
- Never leave candles burning unattended.
- Always place candles on a fireproof surface. (See our safety regulations . )
