Learn how to make candles - summary
Basic materials for making candles.
The following basic materials are needed to make the simplest candle.
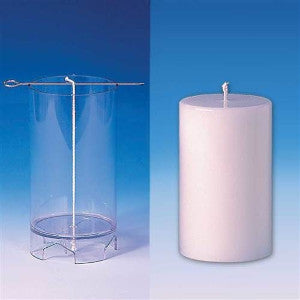
Casting molds that can withstand a maximum temperature of 100°
-------------------------------------------------- ------------------------------------
Preparation of the mold.
Proceed as follows (photos to follow):
1 Use a sturdy, thick needle that can be guided through the mold (bottom).
2 The wick to be used, which is applicable for the candle to be poured, passes through the needle. (wick thickness see below). Also place the seal of the candle mold over the needle and guide the seal along the wick so that everything (casting mold and wick and needle at the top is stretched straight). After the needle with wick has been pushed through the opening at the bottom of the mold, the wick may be placed at the top of the cast can be attached to a needle or other sturdy material (I use metal rods or needles)
After everything has been securely attached (wick, wick holder, etc.), the bottom of the shape where the end of the wick is located can be cut.
Always ensure that the wick is always straight and not twisted in the casting mould. The twisted shape of the wick can cause restless burning.
Always use flat blades (reinforced) instead of round blades. When using only stearin, round wicks are recommended.
Preparation for pouring into glass molds.
1 Use our high neck wick base . Pass the wick through the wick base.
2 Squeeze the neck of the wick base so that the wick does not come loose.
3 Hang the wick with a needle or wooden stick (satellite stick, for example).
4 Use our paraffin for glass , this paraffin adheres better to the glass or other materials such as earthenware, plastic,...
5 Heat the paraffin for glass, without adding stearin, to 68° C.
6 Only add coloring and/or fragrance at the end when the paraffin has reached the correct temperature.
7 Slowly pour the paraffin into the mold and adjust the wick with the wick base to the center of the candle shape.
Paraffin for glass has the property of having low shrinkage. After the paraffin has hardened, pouring it once will suffice.
Preparing immersion candles (table candles)
Table candles are dipped to achieve the desired thickness layer by layer. This form of candle making cannot be cast, but pressed as with the cheaper products available on the market.
How to proceed?
1 use the thinnest wick (3x7)
2 dipping is done with a holder over which the wick is placed and this with holders of 6 candles or more. Also with this type of candle, make sure that the wick is placed straight and not twisted.
3 Dipping is done in a kettle high enough to obtain the desired length of the candle. An ideal temperature is 71°C, as low as possible because you must wait a while between each immersion so that the previous layer can harden. When you start dipping, the entire process must be completed otherwise layers will be formed that can separate from each other.
4 Dipping is approximately 15 to 30 times depending on the desired thickness of the table candle.
5 The last immersion is best done at 85°C to obtain a smooth surface.
Tip: let the immersion candles harden for a few hours. If the candles have not hardened, they will warp when you remove them from the holder due to the shrinkage of the paraffin.
Ratios of stearin and paraffin
With candle remains
If you are making your first candles, you will probably use candle scraps that you had or received yourself. Because we do not always know the composition of candle remains that have not been made ourselves, I recommend that you use the following proportions. It is also very important that the candle remains are properly cleaned first. Melt the candle remains and pour everything through a metal fine sieve in which you form one sheet of paper handkerchief so that impurities and old wicks remain behind.
50% candle residue
50% new paraffin
10% stearin = from the candle residue/paraffin ratio.
Paraffin candle.
When making candles with new paraffin, the ratio is:
85% to 90% paraffin of good quality
15% to 10% stearin of good quality
If you use more stearin, the paraffin will burn out faster than the stearin, resulting in the wick becoming too small and the candle going out.
Thickness of wick/wick
There are mainly two types of blades. Flat and round blades. I only use the flat blades which are also reinforced. The reason why flat wicks are used is especially important for paraffin candles. Stearin candles are more suitable for the round wicks.
What thickness are available for blades and their matching burn circle?
Diameter candle Description wick
Indoor candles
1 1cm to 5cm (3x7)
2 5cm to 6cm (3x8)
3 6cm to 7cm (3x9)
4 7cm to 8cm (3x10)
5 8cm to 10cm (3x12)
Outdoor candles
1 10cm to 20cm (5mm)
2 12cm to 22cm (7mm)
3 15cm to 25cm (9mm)
4 20cm to 30cm (12mm)
-------------------------------------------------- -----------------------------------
Preparing the mold
Preparation for casting the moulds.
1 First, the stearin in the melting kettle must become a liquid. The stearin has a watery appearance when this matter is completely melted.
2 A possible coloring agent can be added to the stearin in the melting process. The addition of a dye must be done before the paraffin is administered.
3 Add paraffin in the correct proportion to the already melted mixture. (see point 3 - Preparing the mold)
Temperatures used in casting.
There are different temperatures that can be used when pouring candles. Everything depends on the desired appearance and result.
Paraffin melts at 56°C and catches fire at 180°C
To obtain a smooth structure of the candle (when using plastic moulds), the temperature is between 80°C and 90°C. The difference between the two temperatures depends on the environment where you make candles or the season. In the summer a candle will solidify more slowly than in the winter. I use 76° to 78° in a stable temperature in my studio. A colleague even casts at a lower temperature for the same result, namely 72°C
If you have used too low a temperature but still want a shiny candle without having to melt the candle, you can always use a dipping lacquer.
At temperatures lower than 71°C you will get a marbled appearance of the candle. You will then have to clean the mold more often. This method of using lower temperatures is also called cold casting. To obtain a more even appearance, it is better to use marble wax.
If the paraffin mixture has exceeded 100°C, this mixture can only be used for making outdoor candles.
CONSTANTLY USE YOUR THERMOMETER!! to maintain a constant pouring temperature.